Making the Sea Monster: Part 4

The sea monster is complete! I will think twice before planning another sequin project, but I am very pleased with the results. Here are some detail photos of the final phase of construction. I averaged about eight hours per inch of body coverage on this puppet that is about three feet long.

See Making the Sea Monster: Part 3, Making the Sea Monster: Part 2 and Making the Sea Monster: Part 1 too!

Sequining the sea monster’s arms now
Finished the left arm
Finished sequining the sea monster’s neck.
Up to the ears now...
Almost done with the sequins


This picture is actually the first frame of a video clip showing the entire body. View it on Instagram.


Making the Sea Monster: Part 3

The Sea Monster is coming along! The tail and back legs are sequinned and the finger and tail claws are in place. The claws are made of fake fingernails that I trimmed to size. I melted two holes into each nail base and sewed to the digits before sewing on the sequins.

Working on the sea monster claws
Melting pin holes for sewing to the toe.
Sewing on the sea monster claw
Now a little shimmer polish and toe scales.
Sea monster getting ready for her manicure
Sea monster claws
Sea monster claws
Sea monster claws
Sea monster foot completed.
Finished a leg!
Follow me on Instagram for regular updates! https://www.instagram.com/christianecegavske/


Locking It Down

There are so many little things to keep track of for a successful animation shoot. Paper that doesn’t want to lay flat must be controlled. Things that could move when they shouldn’t must be locked down. Hands that won’t hold things need to be firmly attached to them. And a puppet that needs to leap or carry something too heavy for its foot magnets to support must be rigged.

Here are some of the ways I have secured my props and puppet recently:

sewn-01

The star map was too heavy and slick for my puppet to hold, so I sewed his hands to it. On the reverse side from the camera, you can see where the thread stretches between his hands.

magnets-01

The map is made of heavy paper and would not lay flat so it is held down with magnets placed out of frame. The set has a metal sheet under the paper mache.

magnets-03

Strong magnets hold the map in place as the puppet unrolls it. Without them the roll would be very loose and uncontrolled.

magnets-02

Sometimes the puppet has trouble standing up on one magnetic foot so I tuck a few tiny magnets under his raised foot to balance. In this shot, it could not be seen from the camera angle used. If I have to do this for an angle where they show, I can mask them out using Adobe After Effects.

t-nut-01

In preparation for rigging my puppet for his leap between rocks, I sewed a T-nut to his side that will be away from the camera. I ended up sewing a T-nut to the bag too because it is so heavy it was making him tip on the rig.

rig-02

The wire rig is attached to the T-nut.

rig-01

The first of three rigs used in this shot is placed behind the rock the puppet jumps from. The second rig is suspended from the ceiling and the third is on the rock that he is leaping to. He needed the rig for walking on the rock because the bag is too heavy for him to stay upright on his foot magnets. It was designed to be dragged but I chose to have it slung over his shoulder for the jump.

screen-shot-2017-02-25-at-2-12-55-pm

Here you see the overhead rig holding him up and a line of tiny magnets attached to a screw on the rock to keep him from spinning. If you click this link you can see the partially completed rig removal. The first 42 frames have had the rig masked out using Adobe After Effects and the rest of the shot is still in progress.

Making the Sea Monster: Part 2

I’ve made some more progress on my big, dangerous monster of the sand sea. See the first post detailing the making of the armature and skull here Making the Sea Monster: Part 1.

The teeth are part of the skull, but the lips are separate. Armature wire is encased in the skin fabric and fastened behind the skull. The fabric is glued above the teeth with hot glue.

The skin is made of sparkly spandex. Most of the monster’s body will be covered in sequins. The sparkly fabric will show on the more delicate parts such as fingers, toes and lips. To blend that with the sequins, I plan to use thinly applied silver acrylic paint. Below you see a sample from one of my experiments, along with the beginning of the application of the sequin scales. This is a very labor intensive process! I work on it little by little, often an hour or two in the evening. I won’t be needing the sea monster for a while so she is not my first priority in the production schedule for Seed in the Sand. Most of the time I have available for working on my personal projects is devoted to animating.

Here she is so far. Ready for sequins and paint!

sm-skin

The fabric skin is only glued above the lips. All other areas are sewn onto the body. I avoided using glue where possible so it would not interfere with sewing the sequin scales on.

Inside the Nest

mate-in-nest

The puppet lounges under her crocheted blanket inside of the completed nest.

The red nests in the trees on the meadow set have been constructed to be seen from the outside only. I also plan to have intimate shots of the main characters inside of their nest so I created a new nest interior with an open side. Using the existing nests as a reference point I wove together sticks with wire to form the frame and splayed out the sides to help avoid seeing any edges in the shots. Next I covered the inside in air drying clay. This clay cracks when it dries, so I filled the cracks with spackle and then painted the nest red.

nest-reference

Reference photo of the existing nest in the meadow set.

nest-weaving-sticks

The first step is to weave the foundation out of sticks and wire. Photo by Adam Hoffsette.

nest-starting-clay

After the framework is woven with the wire and sticks, it is filled in with more sticks that are secured with hot glue. You also see the start of the clay layer in this photo. Photo by Adam Hoffsette.

nest-full

A puppet in the completed nest with the green screen backdrop. Most shots will be completely inside of the nest. I have the green screen set up for the few that will show the meadow tree tops and other characters peering into the nest.

Building the Shore of the Sand Sea: Part Three

Screen Shot 2016-11-13 at 7.25.34 PM.pngThe shore of the sand sea is complete and animation has begun! The wave generating mechanism is working as I had hoped it would. It keeps the sand sea in the background moving. The waves crashing on the rocks in the foreground are animated with a variety of brushes, including a dusting brush used for drafting, a two inch paintbrush and a soft broom. Continue reading to learn how the wave generator was made.

wave-generator-mechanics

Four rows of plated steel slotted angles holding 1/8th inch threaded rod tipped with plastic have been installed under the perforated metal tables using 1/4 inch threaded rod. These can now be raised and lowered incrementally to animate the waves in the sand. Photo by Adam Hoffsette

wave-generator-all-levels

photo by Adam Hoffsette

wave-generator-metal-plates

From the top you can see the plastic shapes that will make the waves. Photo by Adam Hoffsette

fabric

The perforated metal tables are then covered with cloth that has been dyed to blend with the sand. Photo by Adam Hoffsette

adding-sand

Sand is poured onto the cloth.

smoothing-sand

The set is so large, I had to climb onto the table to smooth the sand in the center. Photo by Adam Hoffsette

sss-lighting-set-up-front

Here you see the lighting setup. 500 watt bulbs are bounced off of a sheet of foam core and grey paper stapled to the ceiling to throw diffused light onto the set. The pebbles that were sifted out of the sand were used to make DIY sandbags for stabilizing the light stands. Photo by Adam Hoffsette

lighing-behind

For lighting the translum backdrop, one LED flood light shines up through crumpled tracing paper to create a cloudy look. Photo by Adam Hoffsette


Building the Shore of the Sand Sea: Part Two

painted-rocks

Work continues on the shore of the sand sea. The tables are finished and the rocks and beach are complete. The large rocks are made of high density foam from Van Dyke’s Taxidermy Supply. They have been carved and painted with black paint. I laid out a path of drywall screws for my puppet’s magnetic feet to cling to and then covered all of the surfaces with black tissue paper from Dick Blick Art Materials. The rock surfaces were then painted using a sea sponge and grey acrylic paint to give the final textured effect.

working-on-rocks

The foam rocks are secured to the plywood bases with glue and nails. Photo by Emma Charles.

screws-in-rock

The drywall screws form a path in the foam rock for the magnetic puppet feet.

metal-underlay

Metal for the puppets to walk on is attached to the flat base before it is covered with tissue paper. Photo by Adam Hoffsette.

rocks-in-progress

Gift wrapping tissue paper is not recommended for this technique. We tried it after running out of the paper from Blick’s and it ended up looking like wadded up trash bags because it wouldn’t dissolve into a paper paste as needed. It did work well for forming some of the landscape though. Photo by Adam Hoffsette.

papering-in-progress

The rock surface is created using black tissue paper and glue mixed with water. Photo by Adam Hoffsette.

Screen Shot 2016-10-26 at 1.35.09 PM.png

Click to see a short papering demonstration where a blend of Elmer’s glue and water is brushed onto the paper with a stiff paint brush. The brush is mashed into the paper at the edges to dissolve it so they will blend with other layers. Filmed by Adam Hoffsette.

test_0002

The rock surfaces are all covered in tissue paper.

sponge-painting

Painting rock texture with light grey paint and a natural sponge.

Building the Shore of the Sand Sea

I am building the shore of the sand sea here in my Kansas City studio with the help of my two interns, Emma Charles and Adam Hoffsette. We had our first work day on Sunday and I am amazed at how much we accomplished together. And as an added bonus for the blog, they are both better about remembering to document what we are doing than I am.

Here is a sketch of the shore of the sand sea:

sand-sea-shore

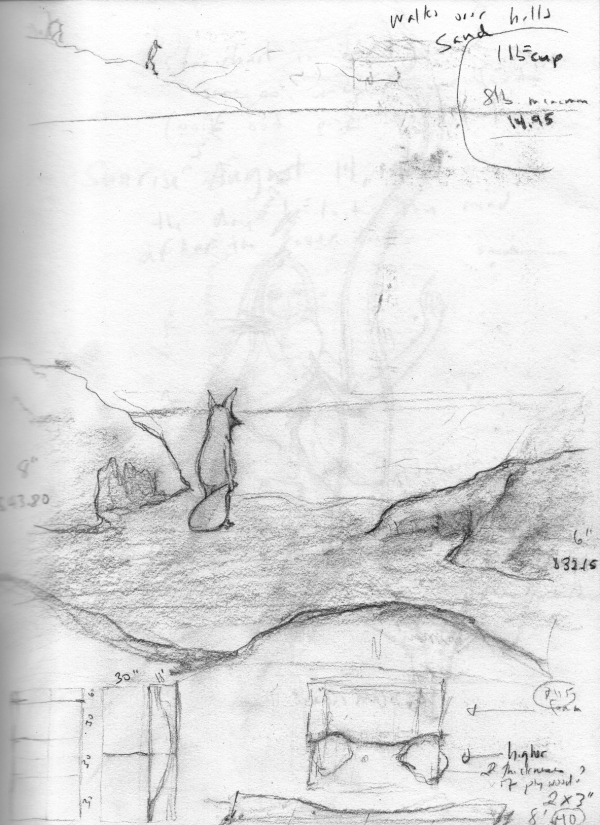
The One stands at the shore of the sand sea.

Detail sketches of the wave generator and set construction plans:

We’ve been working hard to get all of this built and tested. Three tables will support five 24″ x 48″ sheets of perforated steel. This perforated steel is great stuff! It will work for both magnet foot anchors and T-nut foot anchors as well as for my crazy wave generator idea. The only down side is the cost. My generous Patreon supporters are helping to cover part of that. Thank you! I ordered the sheets from OnlineMetals.com.

Photos of us at work:

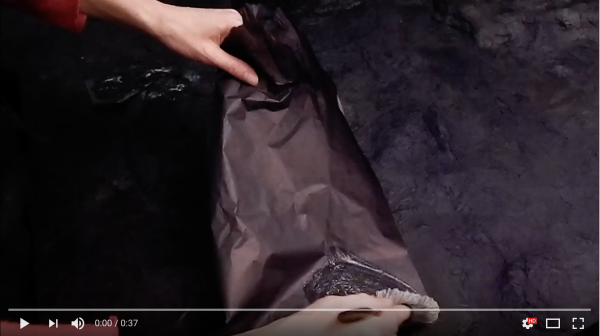
We tested my wave generator idea and I am very happy with the results. It worked a lot like I had planned and we made some important adjustments to the initial idea. Now I need to buy a lot of little bits of hardware to make it full sized! Note: The cherry print fabric will not be used in the final version. It just happened to be what I had on hand for testing. The final fabric will be the same color as the sand. Emma shot some photos and video of the tests and I edited those together to make a record of our session:

Screen Shot 2016-08-29 at 5.27.17 PM

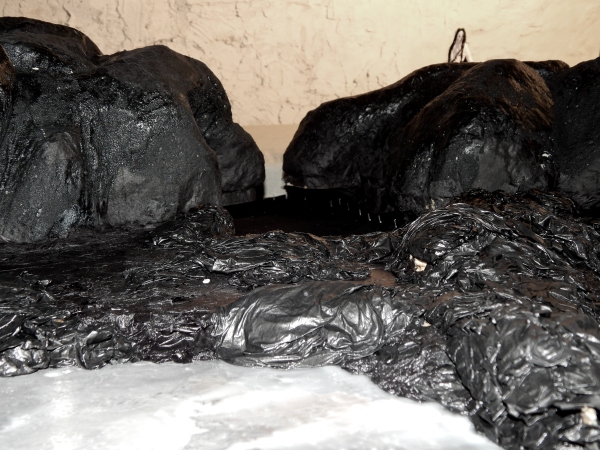
We put spackle on the foam rocks that I had carved and painted the black undercoat. My next step with the rocks is to dry brush grey over that.

I purchased 500 lbs of paver sand to use for the sea of sand in May, hoping that it would be dried out by now. That was not the case so Emma spread it out on a cloth in the studio to dry so we can sift out the pebbles. My dog came downstairs to snoop around and decided the sand must be a little bit of outdoors brought inside just for her. She loved it so much she peed on it! I shooed her away quickly and removed the soiled sand.

Giving Life and Emotion to Puppets

I’ve had a really successful summer working in my Oregon studio, completing two and a half minutes of new animation for Seed in the Sand! The goals with this sequence are to show the excitement and emotional ties of the group and the romantic affection between The One and his Mate as the sprouted seed grows into a tree.

Screen Shot 2016-07-29 at 1.55.52 PM

So, how do I go about bringing my puppets to life and making them appear to emote in a way that the audience can feel?

bonding

A snapshot of the creatures on set.

Sometimes the greatest emotional impact can be achieved with the smallest of movements like a subtle tilt of the head, or simply a long pause with no movement at all. Many of the shots I have been working on don’t involve very complex movements. The pair may only move slightly as they look at each other fondly. In some ways this can be more complicated than a walk or big movement. The subtle tilt of a head may need to continue for a second or more. At 24 frames per second shot on twos, that makes 12 movements per second. Each frame requires a movement so small that I can only tell I have moved the character by checking it against the previous frame in DragonFrame and if I move the character just a little too much it can be a real challenge to get back to the correct pose.

While long shots where the characters are barely moving are a normal part of live action filmmaking, in animation the impulse to keep the puppets in constant motion must be held in check if you want to create an emotive or contemplative scene. This level of restraint took me a long time to learn. Even now it may take a few times watching a shot to see how long the pause really needs to be. If I haven’t made it long enough when shooting I will repeat frames in Adobe Premiere until the pause is long enough but not so long that it feels like a freeze frame. The action can usually be paused for at least a half second before it starts to seem unnatural and sometimes even a second can work.

eyelids

Tiny eyelids made of clay and the tools I use to apply them to the puppets.

Well timed blinks add an important element to a character’s reaction to events or suggest that they are considering what is happening at the moment. Also an occasional blink helps them to seem to be alive. Most basic blinks that I animate are four frames long.

The Story Continues: New Life and Impending Starvation

Now that summer is here again I’ve got a nice, long break from my faculty position at Kansas City Art Institute to make as much progress on Seed and the Sand’s meadow scene as I can manage. This set is still in Oregon at the family farm due to its enormousness and fragility! A few weeks ago I set off for the west coast with dog and child. Our first stop was Los Angeles for a little fun with friends and then up to Oregon to deliver my daughter to summer camp and get to work animating!

3-leaves

The first job when we arrived was to reclaim my meadow set from the mice and spiders! The spiders still remain in the margins watching from above, beside and behind. The mice keep out of sight.

My puppets needed some maintenance too. I washed their little hands and brushed their messy fur.

getting-washed

Gently cleaning with a paste of baking soda and a soft brush.

getting-rinsed

Rinsing in cold water.

Getting-brushed.jpg

Grooming and primping.

The storyboard cards are pinned up. I don’t always follow the cards precisely, but they help to guide my animation. I get a lot of inspiration as I work. New shots get added, and some get cut or changed.

Summer2016-storycards

This set of cards tells a story of new life and impending starvation.

The first day animating, I managed seven seconds in 6 and a half hours. I hope I can keep up that pace. I’ve got a month here to get as much done as possible. I plan to be finished with this set by the end of next summer. When I get back to Kansas City in the fall I’ll be building a new set and bringing on a couple of interns to help with background animation!