
For the wire armature, I will use 16 gauge (1/8th inch) aluminum armature wire and 18 gauge copper wire along with a little 24 gauge copper wire for small details. I like the aluminum wire because it bends easily and doesn’t have too much bounce back. Bounce back means that the limb doesn’t stay exactly where you move it so you have to bend it farther than you want in order to get it in the right place. The down side of aluminum wire is that is doesn’t last all that long and your puppet will break and need to be mended at some point during production. I use the 18 gauge copper wire to strengthen the armature. Copper wire doesn’t bend as nicely as the aluminum and has more bounce back, but when the two are combined, I am very happy with the result.

16 gauge aluminum wire is the first step of this armature.
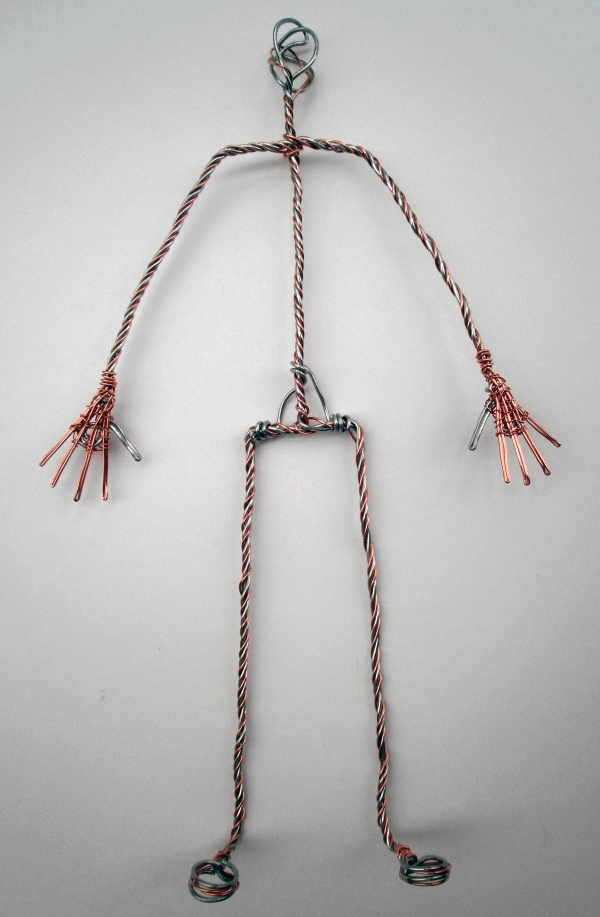
The second step is to add the 18 gauge copper wire to the armature.
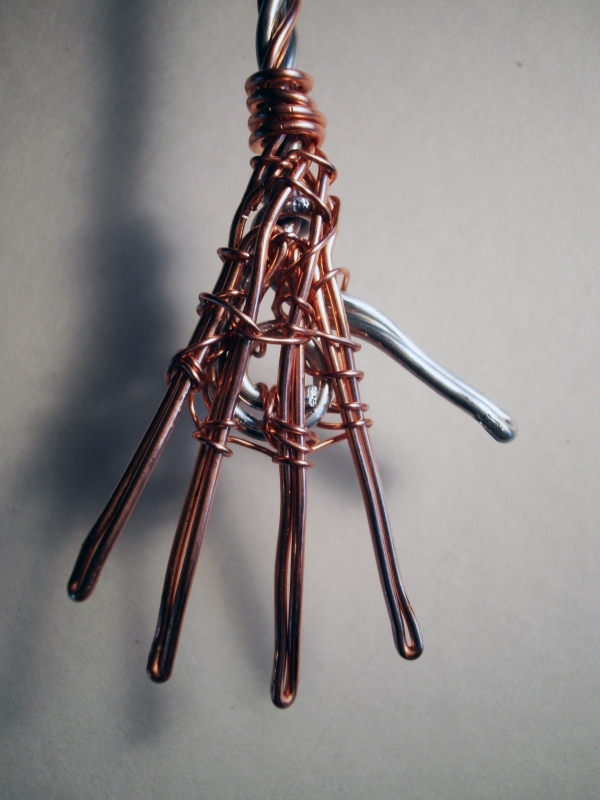
The hand is a combination of 16 gauge aluminum for the thumb and 18 gauge copper wire for the fingers secured to an aluminum wire coil with 24 gauge copper wire.
I know that during a long production some of the puppets will break. When I skin and clothe my puppets, I try to keep in mind that I am likely to need to open them up again at some point for repairs. It is unavoidable when using wire armatures. That is why some people, who have big budgets, prefer to use ball and socket armatures. They are much less likely to break. The trouble they have, besides their high cost, is that their joints can become loose at very inconvenient moments. I can’t offer much information or opinion on puppets with ball and socket joints. I have made costumes for them, which has given me a chance to feel how they move, but I have never animated one.
Here is a site I just discovered that sells a variety of armature kits and other stop motion supplies: http://www.stopmotionstore.com/index.php?main_page=index&cPath=25. He’s got a ball and socket armature on there for $159.99.
Tagged: animation, armature, doll, guide, how to, instructions, puppet, stop motion

Thanks for sharing this. I’ve been studying stop-motion and puppet making on my own. I would love to see how you update this armature with skin and clothes.
I loved Blood Tea and Red String and Seed in the Sand looks like it will be amazing. You’re work is beautiful and I enjoy reading your blog.
Cheers.
Thanks! My goal is to post a new step of puppet construction every Wednesday until she is complete. Next week will be devoted to sculpting the head. I’m sculpting now, and am taking photos of the progress. Best Wishes and thanks for reading!
Chritiane, Your blog is so great. I thought the shot of the puppet from the back was you because of the shoes.
On a side note I have used ball and socket armatures before, the key in keeping them tight is to tighten regularly and keep all oils out of the joint. Once oil gets in there (including greasy fingers) the joint loosens very easily. They are expensive and once they are assembled that’s the armature. Its a huge pain to try and reuse them in another type armature.
Do you make a few of these all at once? Your puppets and set look sooooo good.
Thanks! Sometimes, as in this case, I make one armature and work on only one puppet until finished. With my group of six very similar creatures I made the first puppet by itself from start to finish and for the rest I made them all simultaneously, finishing each step for all before moving to the next step. It saves time to do it this way since each step has its own pile of supplies and creates its own mess.
Hi Christine
I realize this was posted in 2013. I am going to try and build exactly the same armature. I have read this and your previous post. Also studied the pictures in detail. I have some specific questions as it relates from your December 2012 post on Step 1 and then this post’s first picture as far as it relates to twisting wires for spine, arm, neck and head. How can I reach you or should I use the reply box here?
Loved this post. Thanks so much
You can use this reply box. Answering publicly can be helpful to other people who may have the same questions.